Frequently Asked Questions
- All
- Aquabundance
- Cycling
- Fish
- General
- Greenhouses
- Grow Lights
- Nutrients
- Online Farm Courses
- Pests
- pH
- Plants
- School Aquaponics
- Water Quality
- Worms
Yes! Our newsletter is released quarterly and features exclusive deals, farm updates, industry news, & so much more! Just enter your email below to enter our mailing list.
Aquaponic systems provide a great nutrient solution for growing an abundance of plants and most nutrients in aquaponics are provided through the fish feed. However, other nutrients such as iron, are not available and usually need to be supplemented. Depending on many factors such as sunlight, air exchange, the quantity of plants, plant species, pests and any factors related to the health and quantity of your fish, your system will likely require additional nutrient supplementation.
- While fish can provide most of the essential nutrients plants need, aquaponic systems are commonly deficient in Calcium, Potassium and Iron and require supplementation. When supplementing Calcium and Potassium it’s important to alternate these usually with a few days in between. When added together Ca and K can create a nutrient lockout condition. Visit out pH and Nutrient Balancing Page for Aquaponic Source branded products to manage these essential nutrients.
- Iron is not present in most fish diets and therefore supplementing your system with Iron that plants need is a common practice. Shop for DPTA Iron Chelate here.
- Plants need various nutrients to grow properly, most importantly N-P-K
- Plants consume nutrients throughout their entire life cycle
- If your fish population and feed rates are low then plants will not be getting enough nutrients. Managing fish water quality, health and feeding is essential to getting the most out of your fish feed. We have videos on our resources page as well as a full online course on fish health management.
- Leafy greens, herbs and vines consume nitrogen-rich aquaponic water
- To fruit, vine crops need less nitrogen and more of the other nutrients
- When plants show deficiencies, they need nutrient supplementation to grow properly
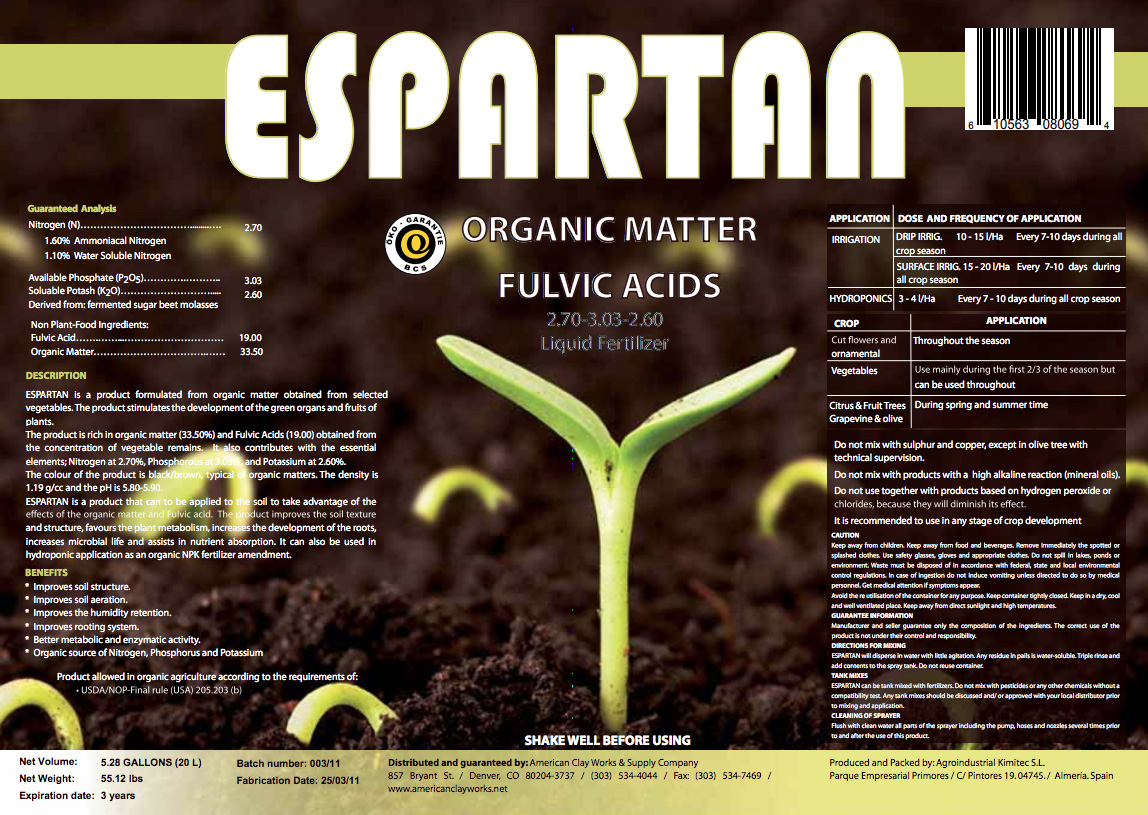
Espartan – If you’re aquaponic system can run decoupled (fish and plant systems operate independently and do not continuously exchange water) we often recommend using Espartan which is a full spectrum organic nutrient solution. Espartan is a product formulated from organic matter obtained from selected vegetables. It stimulates the development of the green leaf structures and fruits of plants. Espartan has been proven to be a safe supplements of nutrients in aquaponics for large and small scale farmers for many years. That said, Espartan will darken your water and we generally recommend not adding directly and consistently to a system that is running with fish. If you have a good population of fish then nutrient deficiencies can often be corrected in other ways. Espartan is great, particularly for farmers, who need to get their plant system up and growing before they have a full population of fish to provide the nutrients.
If you’re starting from scratch and are considering using a greenhouse for aquaponics, we have some resources for you.
First check out our free Aquaponic Greenhouse Design Considerations video that was presented at the 2020 Aquaponics Association Annual conference by JD. This can be found on our Video Resources Page.
We also have a detailed Getting Started Checklist that walks you through important considerations when planning your space or greenhouse.
If you want to dive in deeper or are planning a larger commercial farm venture check out our Aquaponic Greenhouse Planning Online Course.int This class takes you through even more considerations and lessons learned when it comes to site planning, greenhouse development, environmental controls, location considerations and much more.
Of course! The majority of our school purchases are through POs. We accept Tax-Exempt Forms and can provide our W9 and any other documentation required to get us set up as a vendor.
We also accept checks, ACH payments, and credit cards (+ a small processing fee) for all of our systems, supplies, and training packages. Just send us an email and let us know what you need!
Absolutely! Included with the purchase of the system is general lifetime support. We are available for phone and video calls to inspect the system during the installation process. We help you get it right the first time.
During the life cycle of the system, we’re happy to answer your questions around fish, plants, and equipment at no extra charge.
We also have training packages available that dedicate more time to your project that guide you through system operations and a more detailed overview of aquaponics. We can custom tailor our consulting packages to your specific project.
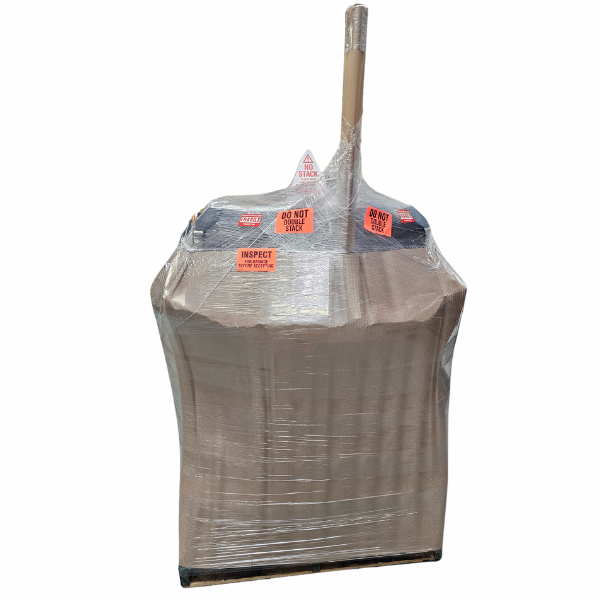
Our systems ship on pallets delivered by a freight company. If your property doesn’t have a forklift or loading dock, we can schedule a freight truck that has a liftgate to lower the system from the truck. After that, it’s your responsibility to store the pallet in a safe location indoors where it will be protected from weather or being misplaced.
Every system is different and the size of the pallet varies from project to project. Part of our quoting process is to provide an estimate for the freight delivery. We do not upcharge on shipping, so when we invoice for the system, only the exact amount is billed.
We include insurance on all freight shipments. If damage occurs during shipping, we will send replacement parts and file a claim with the freight company. Your job is to notify us immediately of the damage and send pictures of the damage so that we can make the claim.
Yes! Our systems have been designed so people can install them without special tools, extra hardware or plumbing experience. For the AquaBundance system, all of the plumbing connections are Quik-loc, Uniseal or Fernco connections that don’t require any cutting, priming or gluing. We provide highly visual assembly manuals for the frame and plumbing systems. As always, we are here to support you the entire way and will be happy to assist if you have any questions during the installation.
If your system is large enough, we are also available to travel to complete the install for you. We normally discuss installation during the preliminary quoting stage so that we can forecast installation dates and fees.
Absolutely! We have three options for system: Stock, modular, and custom. For modular and custom options, our detailed design process dives into your project goals, the intended space for the system, and budgetary considerations. Once we have all the necessary information, we will provide concept layout drawings to show you exactly how the system will fit, how much food you can expect, and most importantly, the cost. We have solutions for every space, size, goals, and budget!
Yes! We have open enrollment for on-the-farm courses for 2025. Our in person classes will be taught over two days consisting of both classroom sessions and hands on demonstrations within fully operational aquaponic greenhouses in various locations across the country. For more information about the in person courses and how to secure your spot, click here.
 Here are some quick tips on dealing with aphids in aquaponics. It’s important to know that Aphids are very common and everyone deals with them at some point or another so don’t take it personally!
- The most important things for managing aphids are strong healthy plants, which means they are growing in their preferred temperature range, with the right nutrients (40-80ppm nitrogen), there is good air flow and air exchange thru the building, plants aren’t too crowded.
- We typically alternate between BotaniGard ES and Azimax or Aziguard. We don’t like Neem oil and haven’t found it to be that effective. BotaniGard ES has bacteria that infect the bugs Azimax is an anti-feedent so they don’t eat and then starve, they also don’t reproduce.
- When spraying, hit the leaves from underneath which is where most the bugs live.
- Toss out any seedlings that already have bugs, they are weak and won’t get stronger.
- Use a variety of spray types to kill bugs multiple ways, always spray later in the day when the sun has gone off the plants.
- Spray light vinegar and water solution to acidify bugs.
- You may need to remove plants that are highly infested.
- Pest management is an on going and forever sort of activity, like washing dishes, and cleaning the house. It’s not the most fun job, but missing a few treatments will result in much bigger headaches.
- Beneficial insects such as, ladybugs or parasitic wasps, can be helpful but are often slow to respond unless they were already there before the aphids because their life cycle is longer than the aphids. Aphids can reproduce significantly faster. Also if the food source (aphids are gone) then the lady bugs are gone too and would have to be introduced.
Question from Grower about high ammonia in aquaponics:
I have a question about high ammonia in aquaponics. Over the past 5 weeks we have had a problem with extremely high ammonium. The reason we know this is we bought a specific ammonia tester and found it to be normal but it’s still a huge concern because I feel like the only reason it’s not converting to ammonia is our PH sits right around 6.0 and we make sure we aren’t making any additions that will push it above 6.2 and risking that conversion to happen. The biggest problem is we can’t figure out why. We contacted the manufacture of the HPPG to see if it’s possible that we lost to many beads but they didn’t think that was the issue. They did think it was flushing too often so be slowed that down. That was 20 days ago. Since that the ammonium has not really changed but we did have 2 days where the Nitrites started jumping up so I thought maybe that was bacteria building back up again. The nitrite is now sitting around .25-.5 for the last 3 days but still no change in the ammonium. It has been around now for that whole 5 weeks. Nitrates are always around 120. Our feed rate is 3150g per day which is below the filters rating. Another interesting thing is we see a change the day after big harvest days. We will get below 8 and then it will be right back up. Please let me know if you can think of anything I can do. Fish are acting normal, eating, swimming around jumping out of the water and very active.
Response from Tawnya:
- For high ammonia in aquaponics, I would check for dead fish and other decay and remove anything found
- Stop feeding for a day or so to try and minimize continued ammonia build up
- Check the tap water to see if that might be the source
- Use calcium or potassium carbonate to adjust pH up and help bacteria convert ammonia more effectively
- Make sure that your ammonia test is actually reporting correctly (we have had single reagents go bad and show the wrong colors)
- If you are using some sort of digital probe device, make sure that it is clean and properly calibrated
For life! Our courses are pre-recorded so you do not have to watch them all at once. Whether you purchase the entire course or individual modules, you have unlimited lifetime access to watch, re-watch, and learn at your own pace.
Your courses can be accessed by clicking on the My Account button in the top right corner of the website and selecting Courses from the drop down menu. Click the download link for a PDF with more detailed instructions with screenshots.
Online Course Login InstructionsYes, you will need to create an account when you purchase either an individual course or the complete farm course. If you don’t have an account already, you will need to create one during the check out process. The nice thing is that once you check out, you are automatically logged in and can view the course right away by clicking the My Account button in the top right corner of the website and selecting Courses from the dropdown menu.
Individual courses range anywhere from 90 minutes to 4 hours! You do not have to watch it all at once. When you complete individual units within a course module, your progress is updated on the course syllabus located in your account settings. You must be logged in to see your course progress.
The Aquabundance system can be installed in many places, however ,some are better suited than others. The AquaBundance system has been installed inside of classrooms, greenhouses, cafeterias, houses, and even outdoors.
Please read our Getting Started Checklist for a more detailed overview of space requirements. Here are a few key considerations:
A solid, level, and cleanable surface is ideal to support the weight of the system and to be able to clean the floor should it get water on it. Installing on carpet is not a good idea. The floor should be level and water resistant.
If installing inside your house, you want to adequate space to walk around all of the tanks and grow beds. Good air ventilation and circulation is important for plant health. Most basements and houses don’t have good outside air exchange which can create high humidity and potentially moldy conditions, so including extra equipment to address environmental controls is important.
You will want to have access to water and power.
Greenhouses can be great so you can have good air exchange and natural sunlight.
Aquaponic systems are extremely heavy when filled with water so don’t install these systems on floors or surfaces that are unable to support the weight. In some cases you may need a structural engineer to verify if your floor is capable of supporting the system.
Yes! If your system is large enough, we are able to travel to complete the install for you. We normally discuss installation during the preliminary quoting stage so that we can forecast installation dates and fees. Travel and lodging fees will apply including the day rate for labor.
If you would like us to install your system, please contact one of our sales and design team specialists. They will discuss your project and location to determine an installation plan.
Shipping Aquabundance Modular systems requires freight delivery on one or more pallets from our Colorado facility to your location. A flat rate shipping fee has been determined for each size system based upon average freight shipping rates for systems in the domestic US. Once you choose the size of your system and options, a flat rate fee will be added on the checkout page. Custom Aquabundance systems that require additional components such as Growasis Modular Raft Systems will need to have freight quoted separately to your destination.
Lift Gates – If you do not have a loading dock or fork lift to unload the truck, you will need to select the lift gate option when you place your order. This allows the delivery truck to safely unload your pallet from the truck to the ground.
Yes, you can use well water in aquaponics but we strongly recommend having your source water tested by a local and reputable lab for heavy metals, contaminants, pathogens and other factors that could require either pre-treatment of the water or use if a different water source prior to introduction into your Aquabundance system. A good resource for learning more about well and ground water testing is Wellowner.org
You can run the system hydroponically with a good full spectrum organic hydroponic nutrient solution such as Espartan. However, this is a more expensive way to run the system in the long haul as opposed to feeding fish who provide nutrients naturally and consistently. Fish feed is less expensive and nutrient delivery is more stable and consistent with fish than it is with periodic dosing of hydro nutrients. That said, you may find running the system initially with a low dose of organic hydroponic nutrients can help get your plants up and thriving until you are able to get your fish delivered. We do not recommend using conventional hydroponic nutrients in an aquaponic system because they may not be safe for fish. We have successfully used Espartan in certain instances in our aquaponic system without fish. Once you are ready to add fish, be sure to not add any more Espartan and test the ammonia and nitrite levels in the water to make sure they are at safe levels.
We do not sell fish or seeds.
Fish – We recommend reaching out to your local fish farmers or doing a web search for your local aquaculture association’s website to see if they can provide you with the species you are looking for. We find it’s best to support your local fish farmer who can usually help deliver your fish and understands their specific needs. There are also suppliers who ship fingerlings around the country that can be found online.
Plants – If you are purchasing seeds, we recommend Johnny’s Seeds. We have been successfully using their products since 2009 and they are a family owned business with a tremendous amount of resources on their website. We also recommend supporting your local nursery or garden center if you are looking for seeds or starts.
You can transfer soil plants into your aquaponics system. Make sure you rinse off all of the soil from the roots before transplanting into your aquaponic system.
Our standard Aquabundance systems come with several pieces of electrical equipment. There are water pumps, air pumps, monitors, heaters, and grow lights.
A small scale AquaBundance system with grow lighting can be expected to require around 25 amps and 42.1 KwH/Day.
Lighting electrical loads can vary significantly depending on the size of your farm, the types of crops you want to grow, and the building structure, and your location. Installing lights on light movers can help reduce the overall cost of fixtures and the operating costs of running lights. Our Aquabundance systems can be fitted with a light rack that allows you to mount light movers and grow lights directly above the plants. We recommend contacting us so we can design a lighting system optimized for your environment.
Yes! Our systems have been designed so people can install them without special tools, extra hardware or plumbing experience. All of the plumbing connections are Quik-loc, Uniseal or Fernco connections that don’t require any cutting, priming or gluing. The frame is assembled using the supplied hex-key wrench. We provide highly visual assembly manuals for the frame and plumbing systems. As always, we are here to support you the entire way and will be happy to assist if you have any questions during the installation.
Answering this question is like predicting the weather 3 months from now. Everyone’s growing results will be different because everyone’s environment is different. There are a variety of factors that will influence plant production in an aquaponic system such as but not limited to: Temperature, humidity, water quality, pH, nutrients, pest management, fish feeding, plant species, available light for plant photosynthesis etc. Most importantly, your ability to properly manage the system and environment and care for the fish, plants and bacteria will ultimately dictate your success. Managing a successful aquaponic garden does require that you learn about the fundamentals of plant and fish health as well as how to manage and adjust various water quality parameters to optimize the system. This is why taking an Aquaponic Class or purchasing the Aquaponic Gardening Book is a really good idea. Many of the most successful growers continue to stay active in our Aquaponic Gardening Forum to talk to other growers and learn about best practices, tips and tricks. The more knowledge you bring to your garden the more you will get out of it.
All of that said, here are a few tables that may be helpful for planning purposes. Please note that these tables assume that a single species of crop such as lettuce or tomatoes are planted per bed. The reality is most of our growers plant a wide variety of crops in each bed to diversify their food production. You will have to experiment with different species to determine plant yields and crop spacing in your system.

For the DWC beds, there are 32 planting spaces in each bed. Lettuce production estimates are based upon 32 planting spaces per bed with an average transplant to harvest time of 5 weeks (culture time). This table assumes that you are just growing lettuce and consistently rotating transplants from your nursery into the DWC bed as you harvest heads out of the bed. This weekly transplanting method allows you to achieve a very consistent harvest and yield which is what our larger scale farmers do to maximize production. To calculate heads per week, divide the total number of plant spaces by the culture time (5 weeks in this scenario) to get the number of heads you can theoretically harvest each week. This means that every week you need to replace the harvested heads with a new group of seedling transplants. In managing this rotation you would have 5 different weeks of growth in the system with a new group ready to be harvested each week. The key is to continue planting the same amount of seedlings each week so you are consistently replacing the harvested crop. Again, results will vary and these estimates are just for planning purposes. Annual lbs of basil is based upon an annual average yield of 5 lbs per sq ft. assuming the entire bed(s) was planted in basil.

For Media Beds which are great for growing a wide variety of crops, we have assumed tomatoes in this example. Tomato production is based upon an average planting density of 4 sq ft per plant and an average yield of 45 lbs per plant. Again, your ability to properly manage nutrients, light, temperature and humidity among other factors will strongly influence the results you achieve. Bell pepper production is based upon an average planting density of 1 plant per sq ft with an average yield of 5 lbs. per plant. These estimates are based upon growers in climates that may be much different than yours.
Fish Production – There are several varieties of fish that can be raised in aquaponics such as Tilapia, Catfish, Koi, Trout and Hybrid Striped Bass. Each species has unique temperature, feed and water quality requirements that will influence their health and growth rates in your system. For more in-depth articles and research on a wide variety of species please refer to the Fish Culture Section on the Regional Aquaculture Centers website.
For the purpose of illustrating some basic estimates of fish production we have chosen Tilapia in this example and are assuming a 12 month growth rate from fingerling size (5 grams) to an average harvest weight of around 1.5 lbs. Growth rates will vary significantly depending on water quality, temperature, daily feed rates and other factors. The stocking density for both size tanks is .3 lbs per gallon. Therefore 40 adult Tilapia weighing a total of 60 lbs would equal .3 lbs per gallon in a 200 gallon tank.
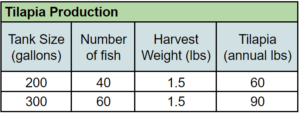
Tilapia Production Table for Aquabundance Systems
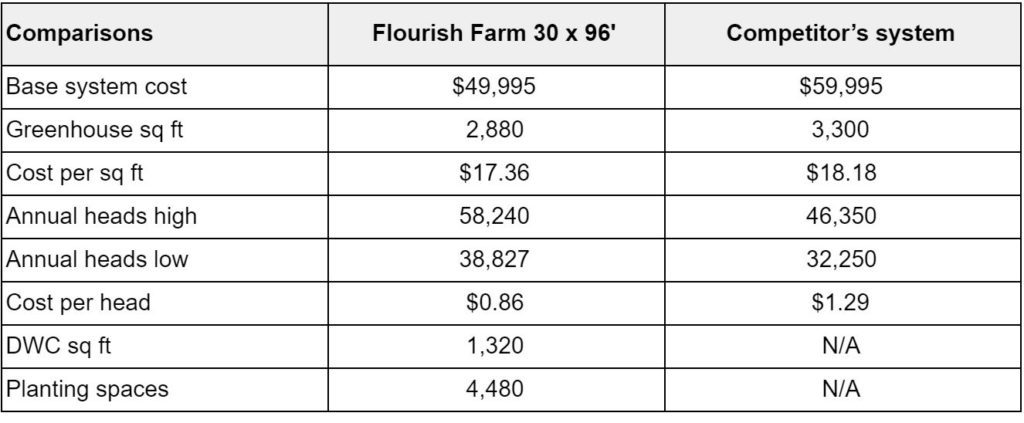
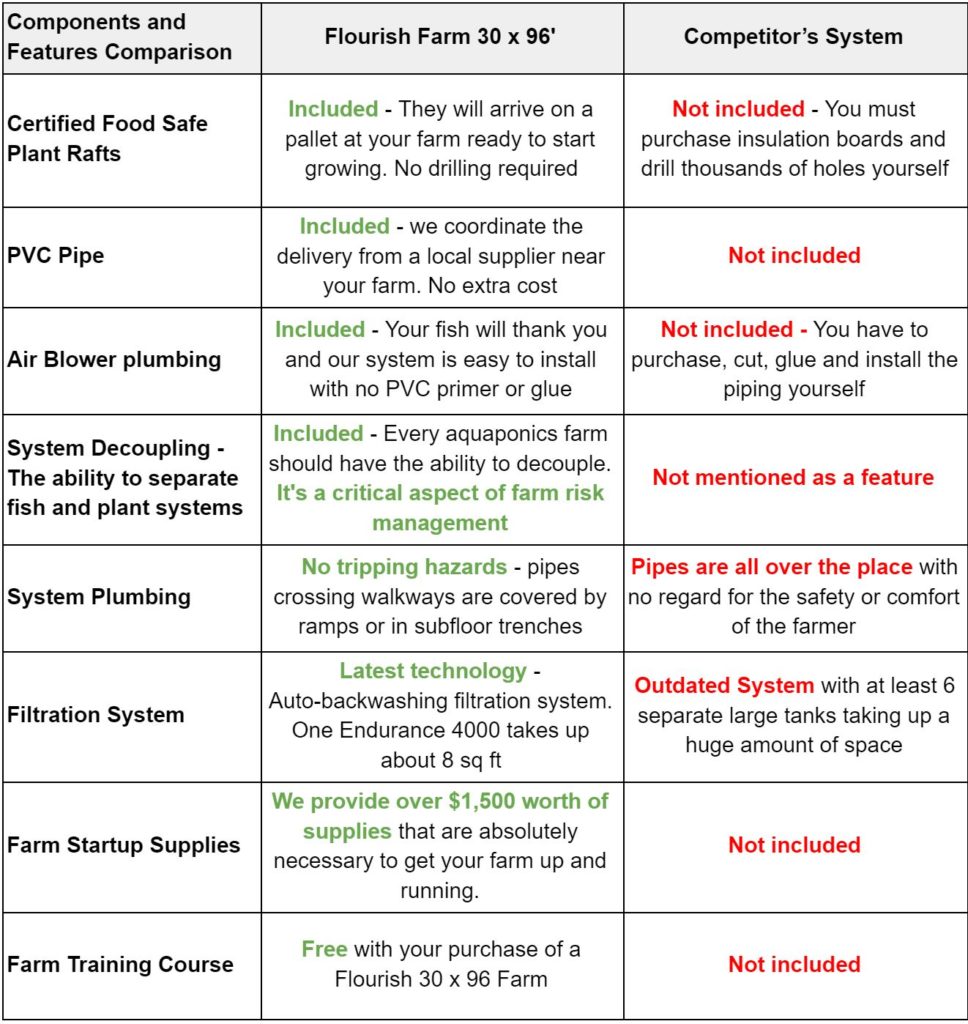
It’s time to take a closer look at how our Flourish Farm Aquaponic Systems match up with one of the most well known commercial aquaponic farm kit systems on the market.
When choosing a turnkey aquaponic farm, it’s important to make an apples to apples comparison of significant features and metrics. One of the most important factors is making sure your system is maximizing production in your space which is costing you money. If you are looking to turn a profit, maximizing plant production per sq ft of space is a critical factor. In our Flourish Farm Systems, we have selected components and designed the farms to give you a high level of production and the best chance of success.
In this comparison, we picked the closest system to our Flourish 30×96’ Farm from our competitors website based upon the listed greenhouse size, cost and production values. For a complete description of all of the features of our Flourish Aquaponic Farms, please download the Flourish Farm Overview document.
Having trouble trying to build up your nitrifying bacteria? We recently wrote a blog post called “The Top 10 Reasons Why Your System Isn’t Cycling“. Hopefully, you can find the answer to your cycling mystery in there!
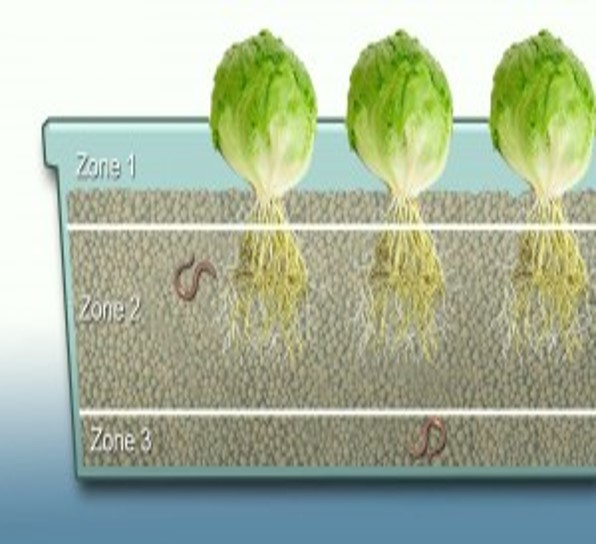
First, you need to purchase them from a reliable source. Our worms are drop-shipped directly to you from a USDA inspected and certified facility. Once they arrive you should add them to your grow beds ASAP. They will actually dig themselves in without any help from you!
Again the answer is “no”. Worms hate the light, and are happiest in the moist dark of your grow beds. The only time you will see your worms in your grow bed is when you pull out a plant. They will be happily intertwined in the roots taking care of sloughed off dead root material.
No. Worms regulate their population to match the conditions within their environment. As soon as those conditions no longer support additional aquaponics worms, they slow down or stop reproducing altogether. Some estimate that worms will triple their population within a year.
Does that mean there’s a worm graveyard growing beneath the surface of your media? No. Worms will actually consume the deceased carcass of other worms. And because worms create their own waste, they’re actually contributing to the nitrification process!
We have all seen worms crawling out onto the sidewalk after a soaking rain, seemly gasping for air. That they choose exposure to the sun and hungry birds to the water logged soil seems to tell us that worms don’t like soaking wet environments. And what is an aquaponics grow bed if not a soaking wet environment?
There are a few differences with aquaponics worms. One is that if you’re design uses a flood and drain style, your grow beds do not remain constantly full of water, but rather flood, and then drain. This allows for a “drying out” period between soakings that also encourages air circulation within the grow media.
The most important reason why worms thrive within aquaponic systems is oxygen. The reason why those worms crawl from the soil to their death on the sidewalk is not because of the water, but because the water has forced the oxygen out of the soil. In aquaponics however, the water that is circulating throughout the system is highly oxygenated. In fact, we have found worms thriving within our sump tanks!
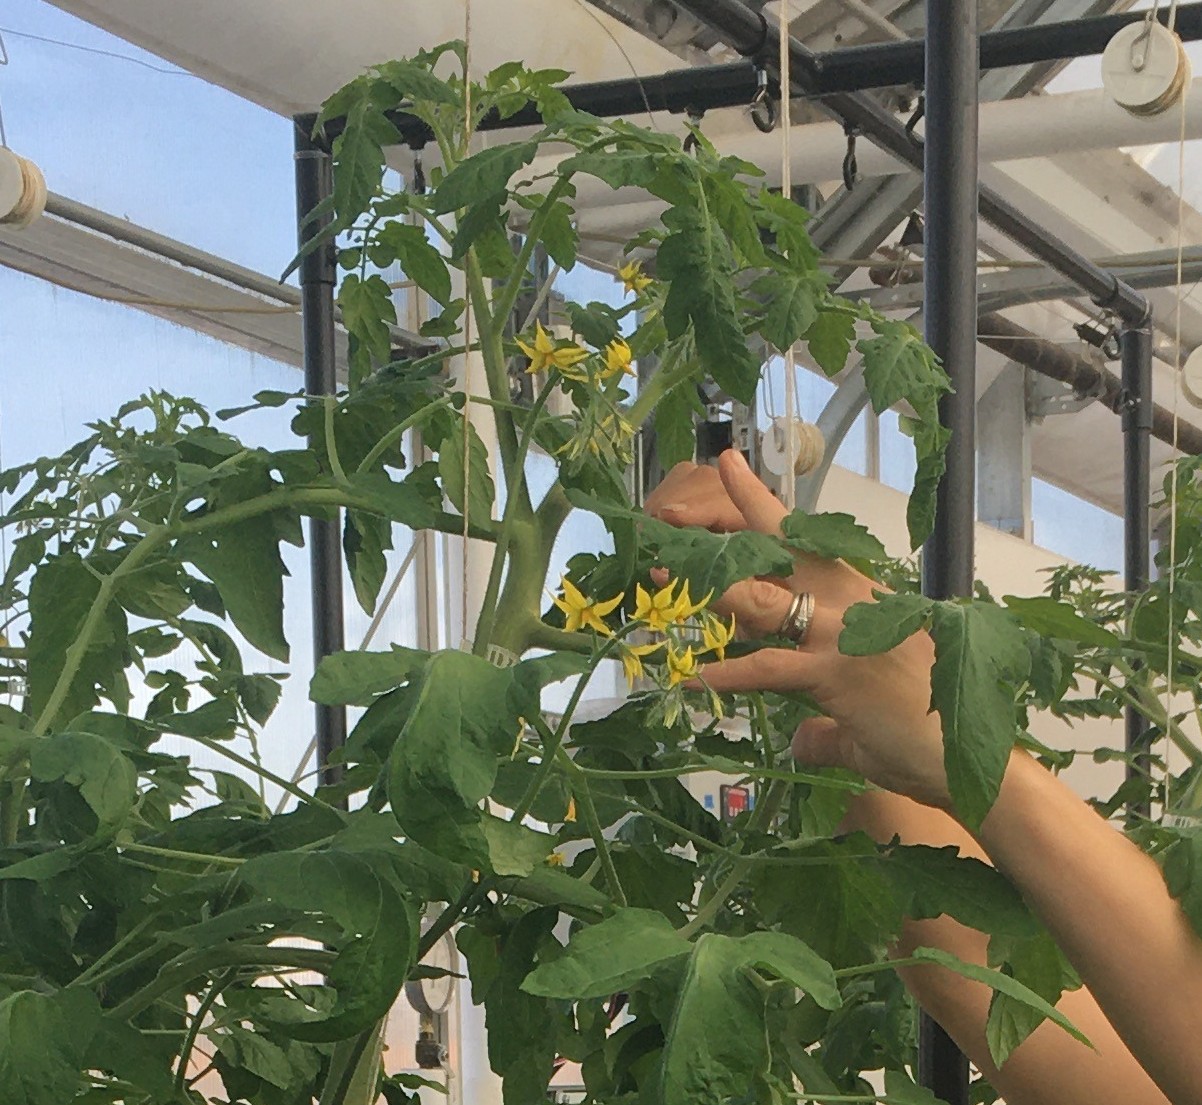 You actually only need to worry about pollination if you are either growing plants for their fruits and vegetables, or your are saving the seeds from your plants. If you are doing either of these, then you will need to understand which pollination category your plants fall into.
Some vining plants require flowers to be pollinated to produce fruit.
Others self-pollinate where shaking the vine or a fan does the pollinating.
Greenhouse bees for pollinating are expense and die quickly indoors.
To hand pollinate, use a circular motion with soft paint brush in each flower.
That depends on the type of plant you are growing, but in general you can plant about twice as densely in aquaponics as you can in a traditional soil-based garden. This is because your aquaponics plants are getting exactly what they need at the root zone (nutrients, water, oxygen) so the plant doesn’t need to send its roots out searching for these things. The result is extremely compact, healthy roots and less competition for nutrients and water below “ground”. Your limiting factor is really how much light is getting to the plant. Check the space recommendations on the seed packet to get a better idea of how much room your plant will need at the full grow-out size, and know that these spacings were typically made for soil gardens so you can likely plant them closer. Just keep in mind that airflow/circulation is an important aspect of plant health AND pest control, so give everyone enough room to breathe freely!
To calculate heads of lettuce per week in deep water culture, divide the total number of plant spaces by the culture time (5 weeks is average) to get the number of heads you can theoretically harvest each week. This means that every week you need to replace the harvested heads with a new group of seedling transplants. In managing this rotation you would have 5 different weeks of growth in the system with a new group ready to be harvested each week. The key is to continue planting the same amount of seedlings each week so you are consistently replacing the harvested crop. Again, results will vary and these estimates are just for planning purposes.
Beware of companies selling aquaponics systems that set unrealistic expectations of how much food their systems can grow! Even though aquaponics does generally experience fast growth rates, it is, in the end, still a natural system bounded by natures rules.
Yes, in fact, we recommend that you do in order for your aquaponic plants to become established so that they are ready to take up nitrates when bacteria cycling is complete and you have added fish to your system. We also highly recommend adding Maxicrop (or in Australia, this product is called Seasol) to your system during cycling to give your plants an initial boost of nutrients before the bacteria is fully established and the fish waste is providing fertilizer.
We do not recommend this method. In general, any small seeds that you would sow directly into your media-based aquaponics system run the risk of being carried away by the flow of your water through the pipes. We have found that larger seeds that you would directly sow in soil (for example, beans, peas, cucumbers) don’t germinate as well within the media bed. For germinating your seeds in the media bed, we recommend using starter plugs such as Rapid Rooter, Rockwool, or coco coir plugs. Ensure that the water level within the bed is high enough to reach the starter plug.
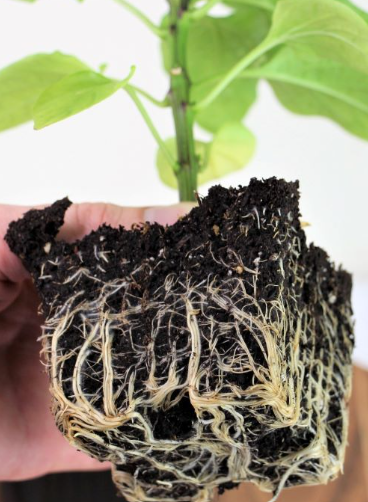 Absolutely! If you’re transplanting from soil, be sure to wash off as much of the dirt as possible and inspect your plants closely for insects before adding a store-bought plant to your system.
If you’re adding a soil-filled potted plant to a media bed, be sure the bottoms are slotted so that the roots can wick up water. Also ensure that soil can’t escape from the pot and trickle into the media beds.
We like to say “anything that grows up grows well in aquaponics”, although that does have a few caveats. Acidic pH loving plants like blueberries won’t grow well in an aquaponic system because the fish could not tolerate the level of acidity that those plants require. Also, deep-rooted crops such as corn or wheat likely won’t have enough room to reach maturity in a 1′ deep media bed, so we typically tell folks to leave those large crops in soil outside and use your aquaponic water to fertilize!
Plants in which the edible portions are the leaf (lettuce, kale, chard, mint, and other greens/herbs) will grow faster and with fewer nutrients than fruiting plants. Plants in which we eat the fruit (tomatoes, strawberries, melons, peppers, etc) will take up more space, time, and nutrients to reach maturity. We know of people growing papayas, figs, strawberries, heirloom tomatoes, and cantaloupe, and so much more. We have even successfully grown typically “subterranean” aquaponics plants like beets and radishes, although we prefer to grow these root crops within an external wicking bed. Experiment and let us know what works for you!
We recommend adding plants as soon as you have started the aquaponic cycling process. Getting your plants in early gives them time to put down new roots and establish themselves before the fish are introduced and nitrates need to be absorbed. We highly recommend adding MaxiCrop soluble seaweed powder to your uninhabited fish tank when you plant, this will give the new plants a boost of micronutrients and encourage them to put down healthy new roots. Our Cycling Kits include powdered MaxiCrop and everything else you need to get your aquaponic system cycled quickly.
To raise pH, we recommend using calcium carbonate and potassium carbonate (AquaUp), and either alternating between them or adding equal amounts of each at the same time. We prefer to use these carbonate compounds instead of hydroxide compounds (calcium hydroxide and potassium hydroxide) for several reasons. First, they add to the strength of our buffer. Second, they are not caustic and won’t burn your skin like the hydroxides will. Third, they are on the OMRI list of approved additives for organically certified production.
To find out how much to use in your system we recommend a technique called titration.
- Take 1 gallon of water from your tank
- Add a measured amount of one of the bagged powders
- Stir until dissolved
- Test the water pH level.
- Repeat until you figure out how much of the AquaUp product you need to increase the pH to the target level.
- Multiply that by the number of gallons in your system to determine a full dosing.
So what do you do if you need to take the pH down in your aquaponics system? To lower pH we recommend certain acids, such as nitric, muriatic, and phosphoric. Our preference is phosphoric (AquaDown) because it is the safest of the three acids (it is an ingredient in cola drinks) and it adds some phosphate into your system, which your plants will like. That said, phosphates can exacerbate an existing algae problem, so if that is your situation you may want to use one of the other types.
You should absolutely avoid citric acid because it is anti-bacterial. Also avoid vinegar because it is too weak of an acid – you could be pickling your fish before you see the pH results you are looking for.
Rapid changes in pH can be harmful to fish so use sparingly and adjust over several hours or days. Add to system a little at a time, wait for it to distribute throughout the system, then retest pH. Repeat, until the desired pH is reached.
The quantity necessary to lower your pH will vary depending on the nature of the grow media and the carbonate level of the water in your system.
To find out how much to use in your system we recommend a technique called titration.
- Take 1 gallon of water from your tank into a separate bucket
- Test the pH
- Add a measured amount of AquaDown and stir
- Repeat until you figure out how much of the AquaDown product you need to decrease the pH to the target level
- Multiply that by the number of gallons in your system
Most water comes out of the tap at pH levels above a neutral 7.0. This is because municipalities are concerned about the long-term corrosive effects of acidic water so they adjust accordingly. If your system water comes from a well, you will probably discover the same thing, but in this case, it is the mineral content of the water that is keeping your pH high.
Good news – a slightly high pH is usually not a problem – here’s why. When you start up a new aquaponics system, you “cycle” it. The cycling process is designed to encourage beneficial nitrifying bacteria to take up residence in your system. This process is entirely focused on the bacteria and the fish and, remember, they both prefer a higher pH. This means that water that is a bit above a pH of 7.0 actually helps to get your system “cycled”. Once the nitrogen cycle is fully established, and you have added plants to your system, you will usually see the pH of your system decrease over time. Why? Because the nitrogen cycle actually produces nitric acid which will naturally cause your pH to go down.
But there will be times, especially when your system is young, when you will need to act to push the pH down. And, conversely, over the long run you will regularly need to raise your pH.
Aquaponic pH management is a bit tricky because there are three living constituencies to consider in an aquaponics ecosystem: Plants, Fish and Bacteria. While the plants generally prefer a slightly acidic pH (5.8-6.2), the fish and bacteria prefer a slightly alkaline pH (7.0-7.6). Therefore, pH management in aquaponics is an exercise in compromise between the two ranges. The ideal target is a pH of 6.8 – 7.0.
Need help measuring your system’s pH? Try out Master Test Kit to test pH, ammonia, nitrite, and nitrate levels!
Pest management in aquaponics is a common required procedure in your aquaponic garden. It’s almost impossible to fully prevent pests from getting into your aquaponic system. But, there are steps you can take to reduce and minimize their impact on your plants.
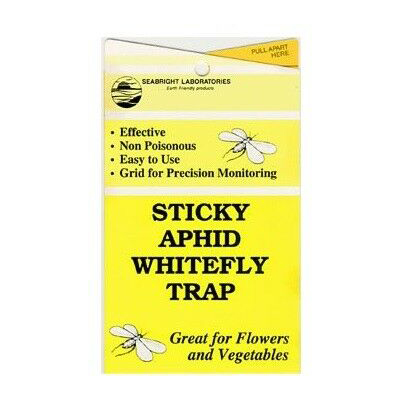 One of the first rules of pest management is to be constantly looking out for harmful bugs. The first step is to identify what bugs you are dealing with. The best way to identify the culprits is with sticky traps, which can attract a broad spectrum of insects.
Most bugs (especially aphids) can be eliminated by simply spraying them off with a water jet. If your plants are small you can also try removing them from the media and letting them soak in the fish tank for at least 15 minutes. This drowns the bugs, and the fish get a treat. If neither of these techniques works we recommend an organic insecticidal soap/spray. Avoid any non-organic pest control treatment, as well as organic products containing Neem and Pyrethrum. Both are toxic to fish. And with any spray, no matter how safe, avoid spraying over the fish tank or rafts. When performing pest management in aquaponics, its important to consider what is safe and unsafe for the fish. Without the fish, there can be no aquaponics!
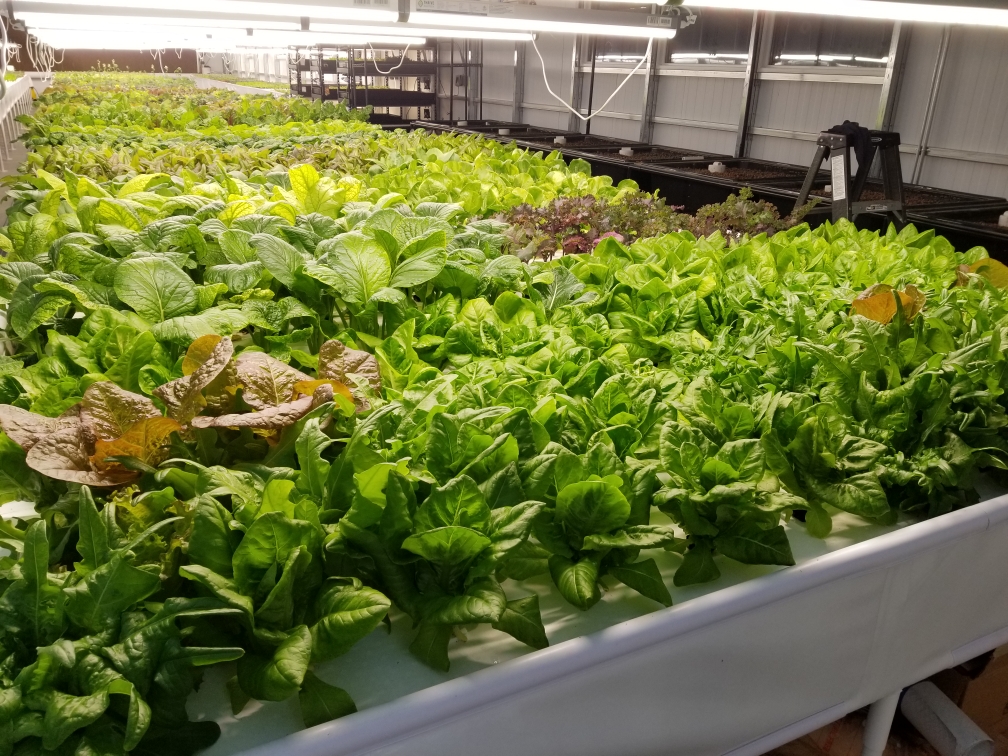 LED’s (Light Emitting Diodes) are widely considered to be the future of plant grow lighting. This is because LED manufacturers are achieving better and better control over the spectrum of light that comes out of LED fixtures through fine-tuning the array of LED’s on the panel. LED fixtures are also more energy efficient than HID fixtures because more of the wattage, or energy, that goes into the fixture is translated into useable PAR light energy.
Another nice benefit of LED fixtures is that the bulbs last longer than their counterparts. In fact, our Apex LED Light Bars have a 40,000 life span.
HID lighting stands for High Intensity Discharge, which is a 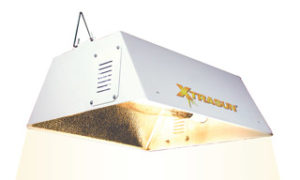 type of light that is one of the more intense (brighter) types of of lighting available. An HID lighting system consists of a ballast, reflector, socket and lamp (light bulb). The ballast acts like the engine, converting and driving energy to illuminate the lamp.
HID lighting options include High Pressure Sodium (HPS), Metal Halide (MH), Mercury Vapor and Low Pressure Sodium. The two typically used for plant growth are HPS and MH systems.
HID systems, specifically 1,000 watt HPS lights have been the standard for greenhouse and indoor lighting for decades. Only in the past couple of years they have started to be replaced with more efficient and targeted LED lighting systems.
Color Temperature is not how hot the lamp is. Color temperature is the relative whiteness of a piece of tungsten steel heated to that temperature in degrees Kelvin. For example, High Pressure Sodium lamps (HPS) have a warm (red) color temperature of around 2700K as compared to Metal Halide (MH) at 4200K, which has a cool (blue) color temperature. Daylight spectrum bulbs most closely replicate the sun’s temperature at 6500K.
Lumen is a measurement of light output. It refers to the amount of light emitted by one candle that falls on one square foot of surface located at a distance of one foot from the candle. Traditionally, lumens have been the unit of visible light emitted from a source, usually referring to indoor lighting for humans; meaning the brighter the lamp the greater the output. However, studies have shown that a broader color spectrum lamp will perform much better than a lamp with high lumen output, especially when it comes to plant growth. More commonly, light for horticulture applications is measured in PPFD, or the amount of photosynthetically available light over one square meter per second.
While the sun is the best “grow light” ever invented, only part of the light that comes from the sun is used by plants for photosynthesis. The photosynthetically active radiation (PAR) contains the wavelengths between 400 and 700 nanometers, and falls just within the so-called visible spectrum (380-770nm). The total visible spectrum is perceived by us humans as white light, but with the aid of a prism, we see that the “white” light is actually separated into a spectrum of colors from violet to blue, to green, yellow, orange and red. Plants use the blue to red light as their energy source for photosynthesis.
Being in Colorado, we often think of passive solar greenhouses as great structures for growing in high altitude cold seasonal climate environments. After all, a good passive solar greenhouse, like the ones designed by our partners at Ceres Greenhouse Solutions in Boulder, is an excellent way to grow year round with fewer energy resources than the typical inefficiencies of common greenhouse structures. However, when it comes to growing in Florida, or other traditionally hot and humid climates, the question of whether or not a highly insulated “cold climate” structure is necessary is certainly worth exploring. For a deeper understanding of actual energy utilization please visit the Ceres website to learn more about their greenhouses and energy calculations.
A properly designed and maintained aquaponic system should not produce any foul smells. When growing fish, you can expect a slight odor, but it should not be offensive. If you have an effective fish waste solids management system (meaning an adequate bacteria population and/or mechanical solids filtration) you should not expect your system to be very smelly. A healthy, aerobic (oxygenated) aquaponic system is what we strive for, and will not smell any more than the smell of a healthy soil garden. Anaerobic zones (oxygen-lacking) within the growbeds, pipes, or other areas of your aquaponic system will cause a foul, sulfur smell. It will be necessary to unclog any anaerobic zones and possibly add air stones to the area to keep the system healthy and odor-“less”.
Often a dead fish in your tank may be the culprit of a foul smell, so be sure to check in on your fish frequently and ensure that you have easy access to the fish tank.
There are fish species that can tolerate low temperatures, Koi can manage to overwinter in below freezing temperatures outside. Trout and salmon are other species that prefer colder temperatures. Most other fish species will not survive outside through a freeze, so be sure to check the temperature range of the fish you intend to grow.
Both plants and bacteria cannot survive temperatures around or below freezing (0°C – 32°F), so growing outdoors through the winter isn’t feasible without a greenhouse to keep extreme temperatures regulated. Without bacteria, you can expect ammonia levels to build up in your tanks, eventually killing your fish.
Yes! Because fish are cold blooded animals their waste does not, and cannot, contain either of these pathogens. In fact, there was a recent study done by the College of Tropical Agriculture in Hawaii titled “A Preliminary Study of Microbial Water Quality Related to Food Safety in Recirculating Aquaponic Fish and Vegetable Production Systems” that explored this very question and concluded that in general aquaponically grown food is even safer than soil grown food! Click the link above to read the report of the study findings.
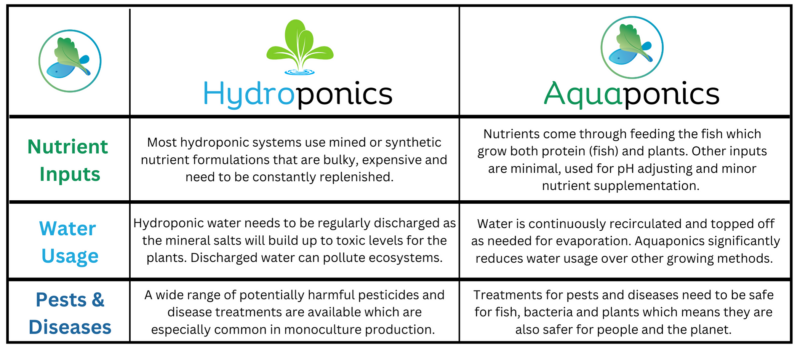
While they are both soilless growing techniques, aquaponics differs from hydroponics in many significant ways. The biggest difference; in aquaponics, the fish provide the nutrients for the plants, where in hydroponics, the plants grow from synthetic nutrients added to the water. For more information, visit our What Is Aquaponics? page.
Absolutely.
In fact, it doesn’t work unless it is organic. The entire system is connected, so trying to fix an issue for one part of your aquaponics system will affect the whole thing. Adding chemicals, antibiotics, or other artificial additives to your aquaponic fish tank would eventually end up harming your plants. If you use pesticides or growth stimulants to aid your plants, it will harm your sensitive fish. Every element that you add to your system must be plant-safe, fish-safe, and definitely nothing that’s anti-bacterial!
In terms of official USDA Organic Certification, commercial aquaponic farms are eligible to be certified. There are strict standards that farm managers must follow, which regulate nutrient additions, pesticide use, food safety, and other aspects of farm operations. For more information, reach out to your local organic inspector.
There are many benefits to growing your food with aquaponics. Remember that aqua stands for aquaculture – raising fish. Ponics – in Latin means to work. Hence, you are putting your fish to work, growing plants! Here are some of the benefits of growing with aquaponics.
- Aquaponics is Sustainable – From efficiently using precious water resources, to producing no waste, aquaponics is sustainable in so many ways. Check out our blog, “7 Ways Aquaponics is Sustainable” for the full run down.
- Aquaponics can be used anywhere – While soil is immensely valuable in growing gardens, there are places which have very poor soil or no soil at all. Sand, heavy clay, asphalt or concrete, soil contaminants or rocky terrain make it difficult if not impossible to grow. Aquaponics, however, allows growing in a wide variety of places. It can be built on parking lots, rooftops, backyards and basements. It allows for growing indoors or outdoors. In addition, Aquaponics can grow year-round where ever you can control the temperatures. Here are some of the benefits of growing with aquaponics.
- Aquaponic is local – It doesn’t get any more local than growing food in your home, school, or small community farm. Most food travels thousands of miles to get to our plates and by the time it arrives it has lost much of its nutritional value. Why not grow more of our produce and protein locally to help the environment.
- Aquaponics is Organic – Growing your own vegetables, fruits and herbs will provide you the most nutrient dense food possible. Aquaponics is a natural ecosystem without any harmful chemical fertilizers and pesticides used in commercial agriculture. Feel confident that you know exactly what’s in the food you’re eating because you grew it yourself!
- Food Security – Food independence and security is increasingly important in these changing times. Aquaponics is one way of living a more self-reliant lifestyle. By adding in solar powered systems and energy-conserving building practices, we can start to see the possibility for everyone to grow their own food.
Pet and Aquarium Stores: Just about any fresh water aquarium fish from a pet store works well as an aquaponics fish. Pay special attention to the temperature range that the fish thrives in, and whether they would be compatible with the other fish in your tank (i.e. not eat them). If your system is very small you might be able to stock your tank simply by visiting your local pet store. Pet store fish we have grown with success in aquaponics so far are goldfish (avoid feeder goldfish, they are prone to disease), koi, oscars, pacu, and guppies.
Hatcheries: More and more fish hatcheries are willing to sell small batches of fish to local aquaponic growers. If you have a hatchery nearby that is willing to sell to you this is a great option if you plan to grow fish to eat.
Online: You can look for local or national fisheries online and order many species through the web to arrive via mail. Please note that live fish are shipped with a limited oxygen supply, so make sure to receive them as soon as they arrive to ensure they don’t stress in extreme oxygen or temperature situations. Specific species may be prohibited in your area, so please be sure to check with your local regulations before ordering.
Yes! And we are proud to be the first company in the country to offer an Organic Aquaponic Fish Feed! Our AquaOrganic feed is free of fish meal, GMO’s and soy. It is the only fish food available that is USDA Certified Organic.
Learn more about the organic nature of aquaponics in our blog post Is Aquaponics Organic?

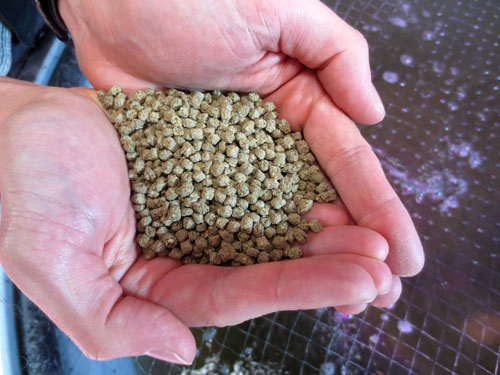 So, what do you feed aquaponic fish? Depends on what type they are. Carnivorous (examples – trout, perch, and bass) require a feed that has high levels of protein (45 – 50%). Omnivorous fish (examples – tilapia, bluegill, koi, and catfish) require a lower protein feed (typically 32% protein). Younger fish require more protein than mature fish.
While we applaud the efforts of those who try to further feed aquaponic fish by producing their own feed (such as cultivating their own Black Soldier Fly larvae, red worms, and duckweed) we still strongly recommend that you feed your fish a professionally formulated feed. This will ensure that not only do these fish that are in your care receive an optimal diet for their health but that your plants also get a balanced diet through their waste.
In an aquaponic system, the fish feed is one of the most important inputs. There is a direct relationship between the feed going into the system and the growth of your plants. Think about it: You add feed into the system, the fish eat the feed and produce ammonia, bacteria convert ammonia into nitrates, the plants consume the nitrates and grow. Because of this relationship, balancing the proper amount of feed entering the system is essential to the overall success of the system. When sizing an aquaponic system, you can use the formula, 20 g of feed per square meter of Deep Water Culture growing area. Using this formula, you can calculate the amount of feed needed in your system.
Only feed the fish what they will consume in 5 minutes – scoop out any uneaten fish food to avoid unwanted water quality issues. If your aquaponic fish don’t seem to be hungry don’t feed them. Fish can survive for weeks without feeding.
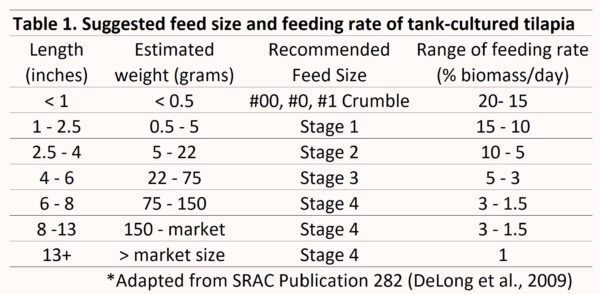
If you are cycling your system with fish, feeding should be kept to a minimum during the first 1-2 months. Once your nitrifying bacteria levels can quickly digest ammonia and nitrites in your system, increase feeding levels, again paying attention to how much the fish consume in 5 minutes. We prefer to feed our fish 2-3 times per day, to encourage a steady metabolic digestion rate and maintain a steady amount of solids. As a guideline, the chart below can be used to determine what percent of their body weight your fish should eat based on their size.
Yes, we like to refer to this as “Fish Cycling,” meaning you will be monitoring the health of your fish population while simultaneously growing the nitrifying bacteria population. Adding the fish before the bacteria does come with some additional challenges, so see our post on Cycling With Fish for special considerations when doing this.
In a smaller sized tank, <50 gallons of water, we recommend stocking the tank with 1″ of fish for every 1 gallon of water. For example, a 10-gallon tank could hold 10x 1″ fish or 5x 2″ fish.
For larger fish in tanks over 50 gallons, we recommend a stocking density of 1 lb of fish per 5 -10 gallons of water, or 1-2 fish per 10 gallons of water. Do not stock more than 1 pound of fish for every three gallons of water, this will greatly increase the potential for fish stress, fish diseases, and an overall imbalance of your aquaponic system.
 The Best Fish for Aquaponics
The first decision to make when selecting fish is if you plan to grow edible fish for harvest or ornamental fish for enjoyment. You can have both types living together in one tank. Other factors are growth rate to harvest, water temperature, tank size, etc.
Aquarium (ornamental) fish should be stocked at roughly 1″ per 1 gallon of water. That could be many smaller fish like guppies or dannos. It could also mean a few larger koi, pacu, or oscars.
Edible fish need at least 50 gallons of water to grow to a reasonable size. Less than this means ornamental, pond or aquarium fish are a good option.
By far, the most popular fish in aquaponics if tilapia. They have rapid growth rates, can handle a wide range of temperatures, and hardy, and are harvestable.

You’ll want to consider the natural environment that the fish species comes from to ensure that your aquaponic system can provide a similar environment. Trout, for example, like water temperatures below 65 degrees. Can your environment consistently provide this? If you are mixing fish species together in the same tank, be sure that they have similar living requirements (koi, tilapia, catfish). Do they all prefer the same water temperature, eat the same food, and have the same oxygen requirements?

- Tilapia and catfish can grow in warmer water, but warmer than 75°F is not ideal for most plants, and can be a breeding ground for undesirable pests and diseases.
- Water temperatures below 68°F are possible with various cool-water fish species, but nitrification and plant growth will slow substantially.
Because of the varying preferences of water temperatures, staying between 70-72° is a happy compromise that keeps bacteria, fish, and plants in a comfortable range. Trying to grow fish or plants outside the optimal range usually results in stress.
Don’t mix carnivorous fish (walleye) with herbivores, or you will find that you are just providing an expensive meal for your carnivores! We have found that tilapia, other cichlids such as oscars, pacu, goldfish, and koi all co-exist well together in an aquaponics system.
For more information on fish health, selection, and management, check out our Fish Health and Management Course.
Unfortunately, nitrifying bacteria are some of the slowest growing bacteria in nature, and the cycling process can take as long as six weeks. There are a few things you can do to speed up this process, however.
Temperature – like most microorganisms, nitrifying bacteria multiply more quickly in warmer conditions. Their optimal temperature is between 77-86°F (25-30°C). If possible, try to keep water temperature within this range while startup cycling. At 64°F (18°C) their growth rates decrease by 50%. At 46-50°F (8-10 °C) it decreases by 75%, and stops all together at 39°F (4°C). It will die off at or below 32°F (0°C) and at or above 120°F (49°C).
pH – Bacteria prefer a pH range between 7 – 8. Use aquaponic pH up and down products to keep your pH in this range during cycling.
Oxygen – Nitrifying bacteria are aerobic and will multiply much faster under highly oxygenated conditions. Even if you are cycling without fish be sure to have as much oxygen in your tank water as you would if the fish were there. Think of the bacteria as just another living organism that requires oxygen in your system.
Adding bacteria – You can “jump start” the process by adding bacteria from an existing colony. Good sources of beneficial bacteria are ranked here, leading with the best (the lower you go on the list the more chance you have of introducing a disease into your system):
- Microbe Lift Nitrifying Bacteria product (included with the AquaCycle Cycling Kits)
- Media from an existing aquaponic system.
- Filter material (sponge, biomedia, brushes, mats, etc.) from an established, disease-free aquarium.
- Gravel from an established, disease-free tank (Many local pet and aquarium stores will give this away if asked.).
- Other ornaments (driftwood, rocks, etc.) from an established aquarium.
- Squeezings from a filter sponge (any pet and aquarium store should be willing to do this…).
- Rocks from a backyard pond with fish in it.
- Rocks from a river, lake or wild pond.
There are several ways to add ammonia to your system, but honestly, the best is to simply purchase our Cycling Kits. They come in 3 sizes – Small (< 100 gallons), Medium (100 – 300 gallons) and Large (300 – 500 gallons). They come with all the ammonia you will need to fully cycle the corresponding size tank, powdered seaweed to provide a rich supply of micronutrients to get your plants off to a great start, and detailed instructions.
With Fishless Cycling you can safely add fish to your aquaponic system after your ammonia and nitrite levels drop to zero, or close to it, and you have measurable levels of nitrates. This tells you that both the ammonia converting bacteria (nitrosomonas) and the nitrite converting bacteria (nitrospira) have become fully established and are ready to efficiently process fish waste.
Please read out blog and other FAQ, What Is Cycling and How Do I Cycle an Aquaponic System?
Once you have your aquaponic system set up and your test kit in hand all you need to do to start the cycling process is add a source of ammonia. Traditionally this has been by adding fish and using the ammonia from their waste, but we’re not a big fan of using fish as an ammonia source. Without nitrifying bacteria established in the system, the rising ammonia and nitrite levels may exceed toxic levels for your fish. Instead, we prefer a technique called “Fishless Cycling” where an external source of ammonia is added to your aquaponics system to establish nitrifying bacteria before your fish arrive in the tank. Why is this?
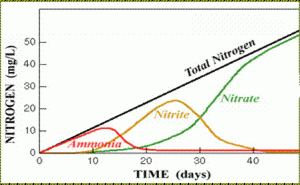
First, both you and your fish will likely experience much less stress because you will not be worrying about your fish health through the nitrifying process. Second, you can more precisely control how much ammonia is added to your system during cycling. For example, if you see that your ammonia level is creeping up to 8 ppm, but no nitrites have shown up yet, just stop adding ammonia for a few days and let the bacteria catch up. You can’t do this with fish, as 8ppm of ammonia will surely kill them!
The practical result is that with Fishless Cycling you can fully stock your tank once cycling is complete, versus gradually increasing your stocking levels as is recommended when cycling with fish. This is especially beneficial to those who are growing aggressive or carnivorous fish because they are less likely to attack each other if they are all introduced to the tank at the same time.
Without being able to see nitrifying bacteria grow, you must have some way of telling where you are in the aquaponics 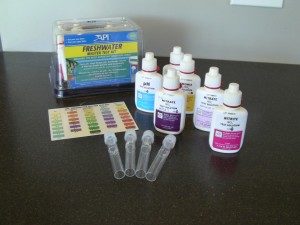 cycling process – typically a four to six-week endeavor. Specifically, you must monitor ammonia, nitrite, and nitrate levels as well as pH so that you know that all these elements are within a target range. If they are not, you may need to take corrective action. This is also the only way that you will know when you are fully cycled and ready to add your fish. Plus, watching the daily progress of the cycling process is fascinating and something you can only see through the lens of a test kit. By the way, once you reach the point that your system is fully cycled, you will need to do much less monitoring than during the cycling process. So get through the cycling process and look forward to reaping the fruits (or should we say the “fish”) of your labor.
To do the testing, most aquaponic gardeners use a product by Aquarium Pharmaceuticals Inc. called the API Freshwater Master Test Kit. This kit is easy to use, is inexpensive, and is designed for monitoring the cycling process in fish systems. That’s why we sell this kit in our shop!
You will also need a submersible thermometer to measure your water temperature. Temperature affects both the cycling rate and the health of your fish and plants once you are up and running.
Nitrogen cycling happens in soil and water all around the earth. 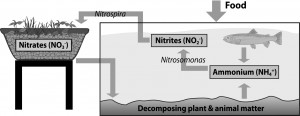 Aquaponics cycling is the natural process of bacteria oxidizing ammonia into nitrates.
The Nitrification “Cycling” Process
Cycling in aquaponics starts when ammonia is present in your aquaponic system. Ammonia (chemical formula NH3) is a compound made of nitrogen and hydrogen. Fish produce ammonia most from their feces, urine, and respiration through their gills. Just as our own waste is toxic to us, ammonia is toxic to fish and can kill them. The cycling process converts ammonia to a less toxic form of nitrogen (nitrate) that plants can readily digest.
Ammonia attracts nitrosomonas, the first of the two types of nitrifying bacteria that will populate on surfaces and in your system’s biofilter. The nitrosomonas bacteria convert the ammonia into nitrites (NO2). This is the first step in the aquaponics cycling process. Unfortunately, nitrites are even more toxic than ammonia! But the cycling process does not stop there. Presence of nitrites will attract the bacteria species nitrobacter. Nitrobacter converts the nitrites into nitrates. Nitrates are generally harmless to the fish and an essential nutrient for your plants.
Cycling Startup
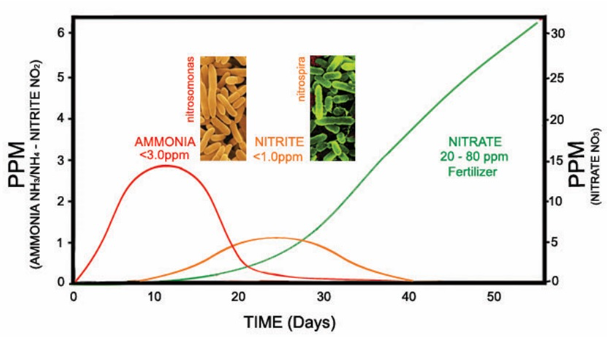
Cycling in aquaponics starts when first setting up or restarting an aquaponic system. The cycling process generally takes from 4-6 weeks. The time frame is dependent on the water temperature (ideally 75° – 80° F or 24° to 26° C). Water temperatures outside this range will take longer to cycle since the bacteria will be slower to eat and reproduce. Once cycling is complete, water temperatures should be between 70° to 75° F, 21° to 24° C). This is a temperature range that is good for both fish and plants.
You can speed up the cycling process by introducing nitrifying bacteria instead of waiting for them to appear on their own. Add a bacteria supplement to the media surface or water, so they can populate your aquaponic system faster.
Cycling with Fish
- Start fish cycling by adding a few hardy fish to the tank like Goldfish, Tilapia or inexpensive Koi for example. The fish will provide the ammonia source. Do not feed the fish for the first 24 hours. Only lightly feed for the first several days and only what they are willing to consume. Excess feed should always be removed from the tank.
- Add a nitrifying bacteria starter such as Nite-Out or let the bacteria populate naturally.
- Perform and record water tests every day to check ammonia, nitrite, and nitrate levels. Ammonia should remain below 3.0 ppm. Nitrites should remain below 1.0 ppm. Nitrates will increase over time.
- Exchange 1/3 of the tank water if ammonia gets above 3.0 ppm, or nitrites above 1.0ppm. Fish can suffer and may die if levels get higher than these.
Fishless Cycling
Cycling with fish can be stressful (on both you and the fish). An alternative is fishless cycling.
- Add a bacteria starter or let the bacteria arrive naturally.
- Add a supply of pure ammonia (powder or liquid) until levels are between 2 to 4.0 ppm.
- Perform water tests daily to detect ammonia, nitrite and nitrate levels.
- Continue to add ammonia to keep the ammonia levels between 2 to 4.o ppm.
- Cycling is complete when ammonia and nitrite levels drop below 0.5 ppm with 24 hours. The presence of nitrates indicates cycling is taking place.
- Stop dosing the system with ammonia and add your fish into the system. Do not feed for the first 24 hours.
Optimizing Cycling
- Cycling will happen quickest when water temperatures are between 74 and 80°F (23-26°C). Any water temperature below 64°F (18°C) will slow bacterial growth rates by 50% or more. After cycling, slowly allow the temperatures to drop into the 70o – 74o range which is better for plant growth.
- Keep your system recirculating and fish tanks aerated while cycling. The beneficial bacteria is aerobic (uses oxygen) and will benefit from higher oxygen levels.
- Be careful not to add chlorinated water or citric acid to your system. Both are detrimental to bacteria and will slow down or stop the cycling process.
- Nitrifying bacteria consume alkalinity in the process of nitrification. Maintaining alkalinity in the form of Calcium Carbonate CaCO3 in the range of 80 to 150ppm (mg/l) is recommended. An alkalinity checker or test strips can be used to measure Alkalinity. If Alkalinity is low (<50ppm) nitrification may be inhibited. Adding CaCO3 (AquaUp) to your system can help to increase your alkalinity level.
Issues With Cycling?
Here are the top 10 things that can create issues with cycling in aquaponics. Small adjustments can work wonders.
- Temperature – During the colder months of the year, this is the number one issue for difficulty in cycling. Optimal temperature is between 77-86o F (25-30o C). At 64o F (18o C) bacteria growth rate decreases 50%. This means cycling will be twice as long as it would be with warmer temperatures or you may struggle with cycling and maintain higher nitrate levels.
- pH is too low – Try to maintain pH between 7.0 and 7.6. Bacteria and fish actually prefer pH around 8.0, but that’s a bit high for the plants to take up nutrients. It’s a balance. The pH will naturally decline as your bacteria population develops.
- Chlorine in the water – Chemicals are added to municipal water supplies for sterilization (i.e. to kill the bacteria). Chlorine dissipates from the water as a gas. If you don’t already have a dechlorinating filter on your incoming water supply you can get rid of chlorine by simply holding the water in a separate tank for a day or two and aerating the water will speed up the process.
- Chloramine in the water – While you can assume your city water supply has chlorine in it, chloramine is also a possibility and is much more difficult to get rid of. You can use a chemical agent such as ChlorAm-X or D-Klor. Another option is to install an activated carbon filter inline with your water supply. Either way, removing chlorine or chloramine will be essential to help your bacteria flourish and keep your fish alive.
- Ammonia not being added regularly – Ammonia must be added on a consistent basis through the cycling process. If you stop “feeding” the bacteria, they will die. This is true from the beginning of cycling all the way until you add fish.
- Too Much Ammonia – Some aquapons believe that ammonia levels higher than 6 ppm will actually cause issues with the cycling process. Some don’t. Adding only enough to produce the results needed seems to make the most sense.
- Alkalinity – Nitrifying bacteria consume alkalinity in the process of nitrification. Maintaining alkalinity in the form of Calcium Carbonate CaCO3 in the range of 80 to 150ppm (mg/l) is recommended. An alkalinity checker or test strips can be used to measure Alkalinity. If Alkalinity is low (<50ppm) nitrification may be inhibited. Adding CaCO3 (AquaUp) to your system can help to increase your alkalinity level.
- Sterile Environment – Indoor environments shut off from outside airflow can benefit greatly from bottled bacteria starter since the nitrifying bacteria may not otherwise be present.
- Lack of Oxygen – Nitrifying bacteria are aerobic. The more oxygen you have flowing through your system the faster your system will cycle. If you are heating your water to encourage bacteria growth be sure to aerate as well.
- Time – Cycling is a natural process that can be encouraged by establishing favorable conditions, but after that Mother Nature is on her own schedule. You might be doing everything right, and the bacteria just need a bit more time.
- You really are cycled; you just don’t know it – The instructions for your API test kit need to be followed closely. If you don’t follow them, you won’t get accurate readings. The Nitrate test is by far the most complex, and therefore the most likely to tell you that you don’t have any nitrates when in fact you actually do. Read and carefully follow the instructions!
You are a bacteria farmer. It is just as important to keep your bacteria happy as your fish and plants. Nitrifying bacteria are essential to the health of your aquaponic system.
Here is what we recommend.
1) Get an API GH and KH Test Kit and figure out what your carbonate levels are.
2) If you are above 4 dKH, then you should be fine for now but be sure to retest weekly as part of your normal testing regime. Remember that as your system matures, it will create more and more nitric acid so your KH levels will drop over time.
3) As you approach a dKH of 4 or lower, we recommend adding potassium bi-carbonate (AquaBuffer) to your system at a rate of 2 ½ teaspoons (12 ml) per 100 gallons of system water for each dKH level you need to go up.
Creating and maintaining a buffer in aquaponics is crucial for stable water quality balancing. While fish can generally adapt to pH levels that are outside of their ideal range, they cannot handle dramatic, rapid swings in pH. We take phone calls every week from customers who are struggling with what appear to be random fish deaths. When we ask them to measure their pH several times during the day, we often see dangerous intra-day swings of an entire point or more! We then ask them to test the KH levels in their water and they nearly always report that they have a dKH that is below 4.0.
In aquaponic systems, we want to maintain a KH of at least 4º and it is safe to go as high as 18º. Use AquaBuffer to increase the KH levels in your system.
Maintaining a buffer is critical for bacterial health. If you get to the point where your system carbonates are completely depleted, your system pH can “crash” (decrease rapidly). If it does, your beneficial bacteria will quickly die and biological filtration will stop entirely.
Third, if you don’t have at least a minimal buffer in aquaponics of 4 dKH established in your system, you will need to manage pH on at least a daily basis (i.e. measure it and adjust as needed). If there is no buffer to offset the nitric acid in your system it will simply lower your pH, unimpeded. So not only is a lack of carbonates dangerous to your fish and bacteria, but it will also create a maintenance nightmare for you!
GH & KH RangeAquarium Life To Buffer In Aquaponics
0º – 3º
(0-50 ppm)Discus, Arowana, Elephantnose,
Neons, Cardinals, Live Plants
3º – 6º
(50-100 ppm)Most tropical fish including
Angelfish, Cichlids, Tetras, Tilapia, Live Plants
6º – 11º
(100-200 ppm)Most tropical fish including
Swordtails, Guppies, Mollies, Goldfish
8º – 12º
(140-200 ppm)Marine fish and invertebrates
At The Aquaponic Source, we help customers with questions and concerns about pH and carbonate buffers in aquaponics each and every day. Generally, the questions fall into one of two categories:
“The water out of my tap is a pH of 8 (or more) and I can’t seem to lower it reliably. What should I do?”
“The pH in my system is dropping constantly and I have to add something to raise it almost daily. Is this normal?”
Most pH mysteries in aquaponic systems boil down to how “hard” your water is that you put into your system. This “hardness” dictates the buffering capacity of water. Let me explain.
Water from most sources has some level of mineral salts dissolved in it (purified water such as distilled or RO filtered [reverse osmosis] are clear exceptions). Among these dissolved salts are certain specific minerals that strongly affect the pH of your water. The concentration of these minerals in your water is often described by the term “hardness” – the higher the concentration of these minerals, the “harder” your water is. There are two types of hardness in water – “carbonate hardness” (KH), which is sometimes also referred to as the water’s “buffering capacity” or “alkalinity” (not to be confused with an “alkaline” solution which would have a pH of greater than 7) and “general hardness” (GH) which refers to the concentration of calcium and magnesium ions in the water.
The general hardness of the water affects pH but it is the buffering capacity (KH) of your water that is the more critical pH factor. This buffering capacity acts like an invisible sponge that soaks up whatever acid or base is in your system – or that you add to your system – until the capacity of the buffer is “used up”. With this sponge-like behavior in mind, imagine trying to adjust your pH. Let’s say you have a pH of 8.0 in your aquaponics system and you would like to bring it down to 7.0. You start adding an acid…and adding…and adding…and little or nothing changes. And then all of a sudden the pH plummets. What has happened? You had a strong buffer (meaning there was a lot of KH) in your system which you eventually “overwhelmed”. Another way of thinking about this is that you “filled up” the sponge.
You can actually measure your KH level using an API GH and KH Test Kit. The larger the KH number, the more resistant your system will be to attempts to alter pH. Having a higher KH level can be beneficial in a fully cycled system because, as you will recall, the nitrification process produces nitric acid which will persistently drive pH down in an unbuffered environment. A rule of thumb is that a KH of less than 4 dKH (“dissolved carbonate hardness”) means that you don’t have much buffering capacity and you may see rapid, frequent swings in pH, so consider adding carbonate buffers in aquaponics to stabilize the water quality.

